Hi, my name is Malinda from Dahlhartlane and I am tickled pink to be here on Amanda's blog today! Since I am a mother of three boys, when Amanda asked me to come up with a tutorial for her bow series the first thing that popped in my head to make were little boy bow ties. Now, I know tutorials on bow ties are all over blog land, but this version is a bit different than the rest and I love it's little double-layered rounded edges.
For these ties, you need to cut out four 3x4 slightly rounded rectangles and one long 2 1/2x 19 inch strip. Of course, you can modify this depending on the size of your child and how big or small you like your bow. You will also need a small strip of velcro (or some other type of clasp).
Take your little rounded rectangle-ish shapes and place them in two pairs with right sides facing in.
Sew each pair around the edges but be sure to leave one inch open in the middle of one side of the base.
Next, fold your long strip of fabric in half and sew along the long edge.
Turn everything right-side-out (I like to do this with a knitting needle) and iron them flat. Take your newly sewn strip of fabric and cut about three inches off and set aside. This little strip will be used to secure your bow in place later.
Take the long strip and turn the ends in by poking your finger into the tube slightly. Sew shut.
Sew on your velcro at the ends of your strip and you collar is complete! Hot dog! Now that aside while you finish your bow.
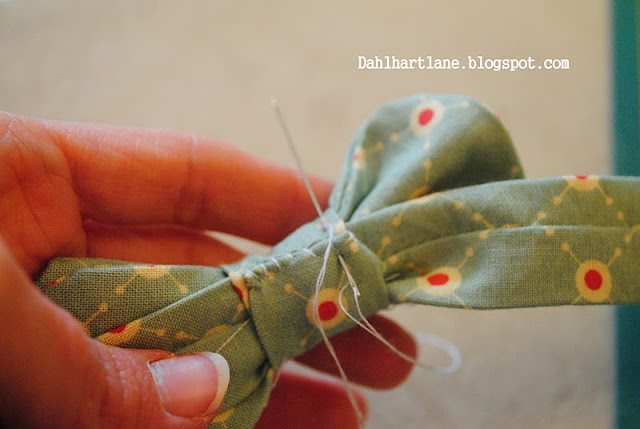
Now, stack your curved rectangle pieces and push your needle and thread through the centers like this:
Pull tight to gather and then wrap your thread tightly around the center several times.
Place your bow on top of the good side of your collar (the side without the seam running down the middle) and then wrap the extra little strip of fabric around both. Turn ends under.
Stitch it shut and your done!
Hot dog! Now your little man is ready for any holiday party thrown his way!
I started making these bow ties several years ago and haven't been able to stop ever since. Any sort of fabric can be used to get the exact look you are hoping for. In fact, come over to my blog to see how I made similar bow ties out of wool sweaters! Super cozy, amazingly easy, and incredibly cute. Thanks, Amanda, for hosting me today! I hope everyone has a wonderful day and holiday season!

These bow ties are SOOO cute!! Thank you Malinda for joining me for "Bow Weeks".
And tell your cute little man that he rocks the bowtie!!
Here's a sneak peek at some more of Malinda's fabulous tutorials.


These bow ties are SOOO cute!! Thank you Malinda for joining me for "Bow Weeks".
And tell your cute little man that he rocks the bowtie!!
Here's a sneak peek at some more of Malinda's fabulous tutorials.


Awww, that is just too sweet! I love that it's smaller--a lot of the little boy bow tie instructions I see seem so BIG! This one is small and sweet and so perfect :-) I love it!
ReplyDeleteThanks so much for hosting me today! What a treat!
ReplyDelete