
of all those wussy bibs that hardly cover anything.
And the velcro closure (at least for my kids) is just
ridiculous. By the time they actually needed bibs, my
kids could rip them off! Ties and snaps are the only
thing that works. So I finally finished a project that's
been cut out for like 4 years! If you have some old
towels hanging around then this is a very economical
project.
the supply list is as follows:
sewing machine
thread (obviously)
pins
towel
fusible interfacing (not necessary but nice)
scrap fabric
1/2 in. double fold bias tape
Start by cutting out your bib from the towel. I like
bigger bibs so mine were approximately 10 inches
wide and 12 1/2 inches long.

Next place your scrap of fabric on the bottom portion
of your bib and cut the scrap to fit.


This next step is where you get creative. Cut out
a gender appropriate shape and if you are using
the interfacing cut the same shape out of the inter-
facing. Iron. I didn't have any on hand so I just pinned
like a crazy person. I also stitched a sort of plus sign in
the middle of the applique to keep it from shifting.
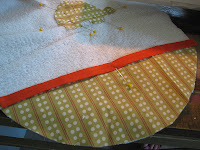
Now cut a piece of bias tape the same width of the bib.
Pin over the raw edge of the scrap fabric on the bottom.
Then zigzag over both edges of the bias tape.

zigzag around your applique.
It's time to stitch the bias tape to your creation.
Start with the neck then stitch around the perimeter
of the bib. Make sure to leave extra bias tape on
either side so that it's tie-able.
This is really just a guide so you can do whatever
you want with it. Be creative. Have fun!
oooh! this looks like an afternoon of crafting fun we could have together.... gossip + sewing = fun!
ReplyDelete